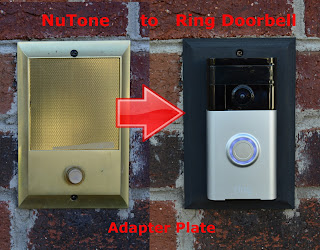
Upgrading your Nutone or M&S system to a Ring Doorbell
***Due to popular demand these plates can be purchased on eBay click here***
Recently we decided to upgrade our old Nutone intercom doorbell to one of the popular Ring doorbells that allow you to monitor the activity out front of your house. The wife insisted on having one since she heard of all these horror stories of home invasions and break ins. So I did what any good husband would do and set out to buy one.
Once we received the new Ring doorbell I went to install it out front of our house in place of our old Nutone intercom system but ran in to a big issue...There was a HUGE hole where the old intercom doorbell system was and the Ring Doorbell couldn't cover or mount in the same place without an adapter plate! So like any engineer would do, I headed off to my lab where my 3D printer an computer are to start designing an adapter plate!
After taking a few measurements from the old doorbell intercom and mounting hole locations of the Ring doorbell I had a 3D model whipped up within a matter of minutes. Once I was satisfied with the design, I downloaded the model to the 3D printer and waited for a couple of hours for it to print my newly designed adapter bracket.
 |
| Ring & Ring 2 adapter plate for Nutone or M&S intercom systems |
The newly printed bracket came out perfect but needed a little light sanding and a paint job to make it look legit.
 |
| Flat black sanded and painted Ring & Ring 2 adapter plate |
Next I installed the adapter plate in the spot where the old Nutone intercom system use to be and attached the old door bell wires to the 2 screws on the Ring base plate. Since my system had an digital doorbell chime (see note below) i had to add in the diode (little black cylindrical thing with 2 bendable wires sticking out from either side). This part took some trial and error to get it in the right orientation as you may have to flip it over if it doesn't work how you initially installed it.
WARNING: Installing the diode with a mechanical door chime could cause damage to the chime so please be sure your system is digital before installing.
Note: Here's how to find out if you have a a digital or mechanical doorbell chime:
1. Press doorbell.
2. Listen for sound.
3a. Does it make the classic "Ding-Dong" sound? Chances are its mechanical and you DONT want to use the diode.
3b. Does it play a tune? Chances are its digital and you WILL need to use the diode.
(here is a good video to check out if you're still unsure click here)
Once you've figured this out the hard part is over! Now its time to attach your Ring doorbell to the base plate and tighten the special screws with the provided tool on the bottom of the Ring doorbell itself.
If you'd like to purchase one of my painted adapter plates click here (there are several color options other than black)


Comments
Post a Comment